
Author: Pieter de Vries

Audio – setting up your camera

Most of the important videos that you will ever create in your life will be crucially dependent on the quality of sound that is captured at the time of recording. Whether it is the vital dialogue, key selling point, memorable quote or even just the atmosphere of the occasion, sound will play an essential part.

To ensure that you get a great result you need to plan for your sound acquisition carefully before you leaving for your location.

Camera Menu Settings

You should familiarise yourself with all the different audio recording menus in your camera as each will need to be set correctly.

Internal Microphone/XLR's

Selects either the internal or built-in microphone, or inputting audio via the XLR inputs.

Mic/Line Level

Selects whether the input is set at mic level (i.e. there is a microphone plugged in) or at line level (if the camera is plugged into a mixer)

AGC (Automatic Gain Control) or Auto AGC

Automatically adjusts the gain control on the camera to constantly provide consistent recording levels to tape.

Unfortunately, this process does not account very well for the dynamic nature of dialogue, and provides a strange sounding result. If you are unable to get satisfactory results by manually setting the gain control, or are not in a situation to constantly monitor and adjust levels, this may be a last option.

Inconsistent levels are better dealt with in post-production.

Noise Reduction

Noise reduction is a basic equalization (EQ) tool designed to reduce constant noise such as mains power hum (A/C).

Results are generally limited and tend to affect the recording quality. This is normally better handled in post production.

Wind Reduction

Very similar to noise reduction with similar limited results. Wind noise can be more easily dealt with by using wind protection on the microphone itself.

Channel 1 Record Select

Channel 1 Record Select enables Channel 1 to be recorded onto both audio tracks.

This is fine when using one mono microphone plugged into the camera, however when two microphones are plugged in, only one would be recorded onto both tracks.

48 kHz or 32 kHz

Always set to 48 kHz. 32 kHz enables a four track recording onto the camera, to facilitate laying a voiceover over pre-recorded audio. It is always better to record at the higher quality and lay any additional voice tracks in post-production.

External Camera Settings

Looking at the switches and controls on the camera body itself, we have:

+48v (Phantom Powering) 

Better quality microphones (known as condenser microphones) require 48 volt power to operate.

Leaving this switched off is a common cause of not being able to record sound. To be safe, most microphones that do not require +48v will work fine with this being switched on, but it can cause some noise with a small percentage of microphones.

Mic/Line Switch

As in menu setting Please note that some cameras have this option as an external switch on the body of the camera.

Auto/Manual Switch

Refers to the AGC (Automatic Gain Control) as discussed in menu settings. Once again, with correct gain level control, this should not be used if possible.

Setting Gain

Finally it is critical to find and set the gain controls on your camera to a “safe” recording zone. Ideally, dialogue should be peaking between –20 (soft) to –10 (loud) on your camera's level meters, maximising the dynamic range. 

If these settings are too low then you run into the problems of noisy recordings from the camera?s audio circuitry. Set too high it could potentially distort the camera.

Whilst much can be done in post-production to fix up your recordings, stay with these basic levels on location and you will have a good start to a great recording.

Three points worth remembering
  1. Plan for your sound before you leave for your location
  2. Ensure your camera is set to record audio at 48 kHz, not 32 kHz
  3. When recording dialogue, set your levels for between -20 and -10 to optimise your cameras dynamic range

Thanks to sound recordist and sound tutor James Nowiczewski for these notes. James is an internationally experienced sound recordist, and he conducts audio for video training courses. 


Croc around the clock – working with Steve Irwin

A few years back I was filming a documentary with Mark Strickson a natural history director with Bristol based UK production company, Partridge Films. We were shooting sequences for Discovery Channel in Far North Queensland in Australia, and were at the tail end of a six week stint shooting "Deadly Crocs" with then relatively unknown Croc Hunter, Steve Irwin. Steve was the same then…and I claim little more than to have introduced him to the art of making and drinking decent strong coffee while we were camping. This may have been a catalyst to his rather odd presenting style.

Having finished most of Steve's sequences, Mark and I set up our tents by the South Kennedy River in Far North Queensland, Australia. We planned to leave early in the morning for a pleasant filming trip up the river in our small tin boat in search of Salt Water Crocs. The next morning we slowly motored up river heading north towards the mouth of the river. There were a large number of "Salties" sunning themselves on the muddy banks. This was encouraging. The river ahead divided, and on the bank where the river split, there was a large lifeless salty taking in the sun. Mouth open and rock solid, it lay motionless in the distance.

I decided to shoot initially from a distance to get a safety shot. This is the shot to get in case I the subject takes its leave. He or she could become shy and quickly slip into the water. I asked Mark to give me some forward motion with the motor to help stabilize the boat and then suggested he switch it off and allow us to drift quietly towards the croc. The resulting footage was smooth as I had my Miller Arrow HD tripod straddling the uneven floor of the boat. It appeared that this animal was very much at ease in the sunny spot and as I knew that I already had a few great shots in the can, I thought we go for the cream. With the tiny outboard switched off, we drifted into the bank with some assistance from the oars. The bow of the boat wedged into the muddy bank around two meters from our croc who was still very much in relaxed mode. 

I found an even closer handheld shooting position at the bow and decided to stabilise myself by quietly placing one foot onto the bank. The plan here was; one foot on the bank and the other in the boat. This prevented the tinny from sliding back off the bank. As I put my foot onto what I though was solid bank, my whole leg sank down, into the mud, all the way to my thigh making an obscene squelching noise! I couldn't pull it out – my let was in too deep and the suction was too strong. 

I whispered loudly to Mark to fire up the outboard and reverse rapidly to yank my leg out. I was there with one foot on floor of the tinny with the other leg buried and seemingly permanently imbedded in three feet of mud. The nine footer was only two meters away and now getting wary – I had nowhere to go. The outboard motor didn't start (have you ever know an outboard to start first go?) and by now I was making way too much noise. Had the croc decided to strike, it would have been curtains.

I'm happy to say that the option of grabbing me, a meal for the taking, was mercifully, not as enticing as the joy of continuing to lie in the warmth of the tropical sun. I can recall his/her eye slowly opening, a slow look to me then…. closing again and back to the business of sleeping. There is truly no way that I could have escaped. I did eventually extract the leg and so here to tell the story.

The trip back to the camp site was interesting. The tide had retreated and the river level by now was dramatically lower. What water there was, was a torrent that flowed the wrong way! We ended up having to carry the boat full of 16mm camera equipment over the rocks . Then we ran out of fuel!

Almost dark and in full view of the many crocs now forming a peanut gallery along the banks, we must have been a site for sore eyes. None of them moved off the bank to take us. I think by now they just felt sorry for us.

© 2013 Pieter de Vries ACS

{modal http://player.vimeo.com/video/45799924|width=500|height=409|Title=The Russian Far East Video Test}Test Vimeo video{/modal}


Yuendumu Northern Territory mentoring & training

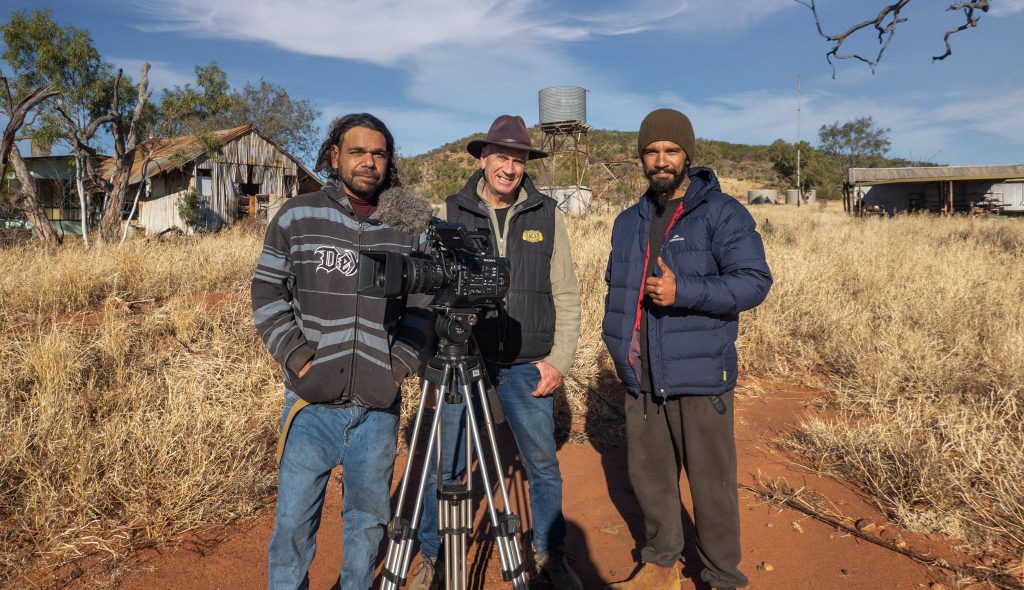
Filming of a feature length documentary is underway in the Central Desert region of the Northern Territory. The film is being written, produced and filmed by PAW Media and Communications (Pintubi Anmatjere Warlpiri) based in Yuendumu, 300k NW of Alice Springs.

I was invited to train and mentor a number of indigenous filmmakers and production team in documentary cinematography techniques, also drone and gimbal operation.
Many key skills were already in place and the unit has the best equipment packages from Sony and Apple so my seven day visit was a pleasure. Our shooting locations took us to some remote overnight camping locations including Central Mount Wedge and the stunning sacred site, Pulka Karrinya.